Wiring a 3-way switch may seem complex at first, but it’s actually a straightforward project when broken down into simple steps. If you’ve ever wanted to control a light fixture from two different locations—like at the top and bottom of a staircase—understanding how to wire a 3-way switch is the key. In this guide, we’ll provide a quick solution right away, followed by an in-depth explanation to help you wire your switches safely and correctly.
👉 Quick Solution:
To wire a 3-way switch, connect the common terminal of the first switch to the power source (hot wire). Then, connect the two traveler wires between the two switches’ traveler terminals. Finally, connect the common terminal on the second switch to the load wire that runs to the light fixture. Always turn off power at the breaker before starting work.
Now let’s break it all down in an easy-to-follow, step-by-step guide.
What Is a 3-Way Switch?
A 3-way switch allows you to control one light fixture from two separate locations. Unlike a single-pole switch (which controls the light from one location), a 3-way switch setup requires two switches and special wiring connections, making it ideal for hallways, staircases, or large rooms.
Tools and Materials You’ll Need
Before you begin, make sure you have the right tools and materials:
- Two 3-way switches
- Electrical wire (typically 14/3 or 12/3 Romex)
- Wire strippers
- Voltage tester
- Screwdriver
- Wire nuts
- Electrical tape
- Light fixture (or existing light)
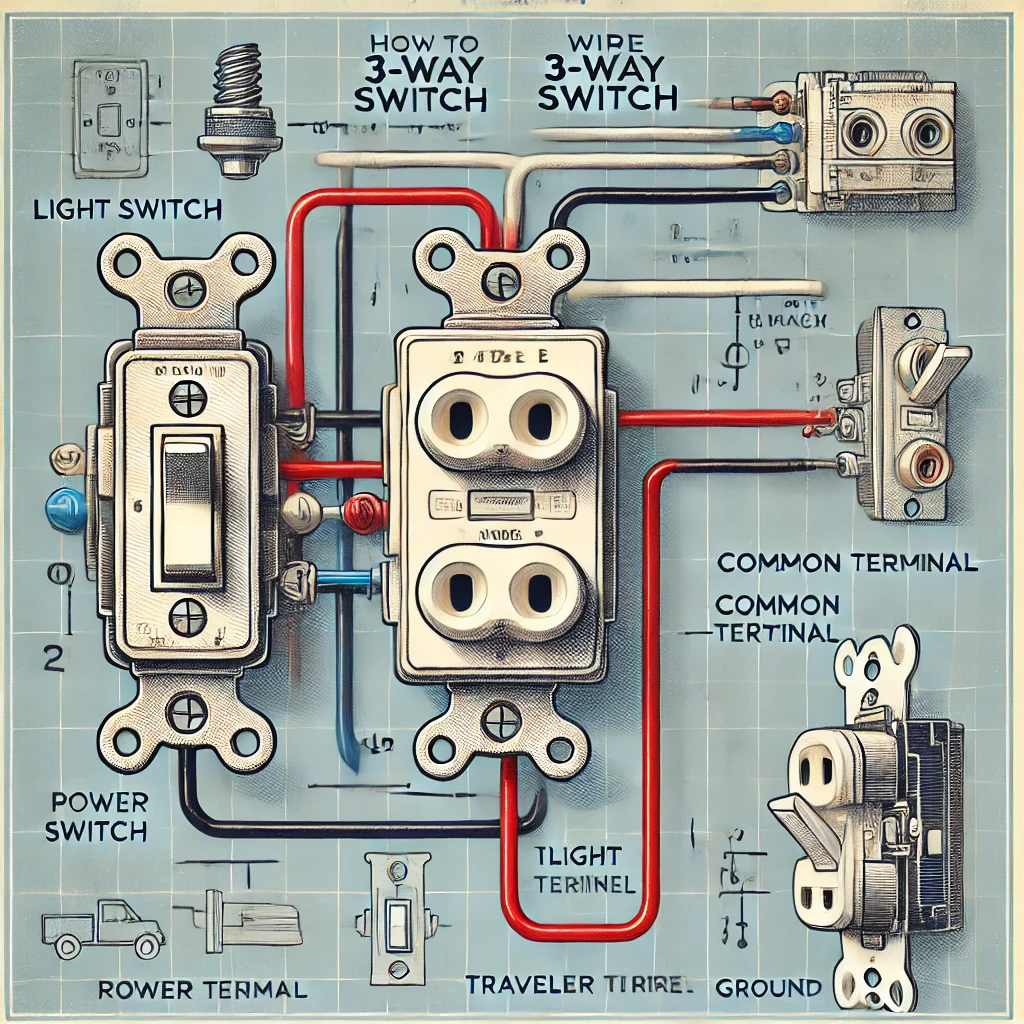
Basic Understanding of 3-Way Switch Terminals
Each 3-way switch has:
- One common terminal (dark-colored screw):
- On the first switch, it connects to the power source (hot wire).
- On the second switch, it connects to the load wire (light fixture).
- Two traveler terminals (brass screws):
- These connect to the traveler wires between the two switches.
- Ground terminal (green screw):
- This connects to the ground wire for safety.
Step-by-Step Instructions on How to Wire a 3-Way Switch
1. Turn Off the Power
Safety first! Switch off the power at the circuit breaker and use a voltage tester to ensure there is no live current.
2. Run Your Wires
For this setup, you’ll typically use 14/3 Romex wire which includes:
- Black (hot)
- Red (traveler)
- White (neutral)
- Bare copper (ground)
You’ll need two separate cables:
- One from the power source to the first switch.
- Another between the two switch boxes, and from the second switch to the light fixture.
3. Wire the First Switch (Power Source Side)
- Connect the hot (black) wire from the power source to the common terminal (dark screw) of the first switch.
- Connect the red and black traveler wires to the traveler terminals (brass screws).
- Ground the switch by connecting the bare copper wire to the green screw.
4. Wire Between Switches
- Run a cable between the two switches.
- Connect the traveler wires (red and black) from the first switch to the traveler terminals on the second switch.
5. Wire the Second Switch (Light Fixture Side)
- Connect the common terminal (dark screw) on the second switch to the black wire going to the light fixture.
- Connect the traveler wires (red and black) to the brass screws.
- Attach the ground wire to the green screw.
6. Wire the Light Fixture
- Connect the black wire from the second switch (load wire) to the black wire on the light fixture.
- Connect the neutral white wire from the power source directly to the white wire on the light fixture.
- Join the ground wires together and attach to the fixture’s ground terminal if it has one.
7. Double-Check All Connections
- Make sure every wire is securely connected and insulated.
- Ensure all ground wires are properly attached for safety.
8. Test Your 3-Way Switch
Turn the breaker back on and test your switches. You should be able to control the light from both locations!
Common Wiring Diagrams for 3-Way Switches
Power at Switch 1
- Power source enters the first switch box.
- Load wire exits from switch 2 to the light fixture.
Power at Light
- Power enters at the light fixture.
- Traveler wires run between both switches, and the light is connected directly to switch 2.
Having a diagram can make this even clearer. (Tip: You can find printable wiring diagrams online, or consult your switch’s manual.)
Safety Tips When Wiring a 3-Way Switch
- Always turn off power before working on any electrical project.
- Use a voltage tester to confirm wires are not live.
- Follow local electrical codes or consult a licensed electrician if unsure.
- Use wire nuts and electrical tape to secure connections.
- Clearly label your wires before connecting to avoid confusion.
Why Use a 3-Way Switch?
A 3-way switch system is perfect when you need to control a single light source from two locations. It adds convenience and safety, especially in areas like:
- Hallways
- Staircases
- Large rooms
- Outdoor walkways
Troubleshooting Tips
If your 3-way switches aren’t working properly:
- Double-check the common terminal connections.
- Ensure traveler wires aren’t crossed.
- Test your switches individually with a voltage tester.
- Confirm the light fixture works with a direct connection.
Conclusion
Wiring a 3-way switch may seem tricky at first, but with a clear understanding of the process and a step-by-step approach, it becomes an achievable DIY project. By following this guide, you can safely install a 3-way switch and control your lighting from two locations. Always prioritize safety by turning off power and testing wires before beginning your work. If you’re ever unsure, it’s smart to call a licensed electrician.
With this skill in your toolkit, you’ll not only improve the functionality of your home but also gain confidence in tackling more electrical projects in the future.